ZUKIWORLD Online – Everything Suzuki Your Complete Suzuki Automotive Resource for Editorial, Tech, Events, Adventure, Racing, and Forum
The Bandit
A Custom Suzuki Sidekick 4×4 With Cool To Spare
Editor: Eric Bewley Story/Photo: J. Simons
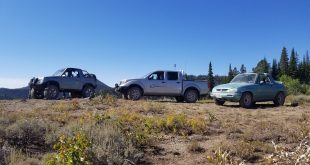
SIOUX CITY, IA – Jeff is probably best know in Suzuki enthusiast circles as the man who brought us all the glory of a themed built Suzuki Samurai based on the General Lee from the hit TV Show “The Dukes of Hazzard”. The Samurai project was a quality build and even has small features relating to the original car that bespoke of his attention to detail and sense of humor. Several years have passed since Jeff had let that Samurai go. Finally enough time had passed to where the itch to build again could not be contained but what to do next? Below is account of the build that Jeff did with help from friends and family, and with a heart-felt nod to his uncle Rick that made this build happen, In Jeff’s words we begin the journey… Wanting to be an underdog, my 4-wheeling friends are used to seeing me in something small like a Suzuki Samurai but a few years in a Samurai made me desire a little more comfort, legroom, and power. My daily driver turned into a mild-build trail rig which was a 4-door Suzuki Sidekick, Calmini lift, geared, and locked on 33’s. I put this together after finding a couple deals on used parts and leftovers. Wheeling in this rig was very fun and impressive to me but I was missing the open top and doors off. I needed the top and doors off! That’s where this build had started…

I had always liked the “Rockstar” build Mike Hagen had put together a few years ago. What appealed to me the most, it was all Suzuki and very capable. My loyalty to the brand has built over the years due to the very good luck I’ve had with Samurai and Sidekicks, so I wanted to stay with the family and build a Suzuki. Recognizing a popular trend in Sidekick builds, I didn’t want a straight axle set-up with Toyota axles. For if I wanted Toyota axles, I would build a Toyota. The final weighing factor was that this was going to be a replacement for the Samurai that I miss the most, the “Zuks Of Hazzard”. DISCUSSION THREAD
My 4 door Sidekick had the wheelbase, and drivetrain, a 2 door Sidekick has the soft top and compact. I wanted both. With reviewing Mike’s build, I had a pretty good game plan on what I wanted to end up with. The 2 door Sidekick with my 4 door’s drive train and lift. I picked up a broke down Sidekick from Craigslist. It was what I wanted, 2 door, 16 Valve, and Auto. I’m a little more fond of the automatic for 4 wheeling, mostly for not having to triple pedal when things get tight. I would sacrifice a bit of power and the ability to rev up or dump the clutch, but I’m more of a driver than a throttle guy. Next, I saved a million pictures, printed articles, looked at bumpers, printed more pictures, and discussed this with my Uncle Rick.
It was the end of Summer, early Fall, when Rick had decided to tear into the project. Knowing our Moab trip was at the end of April, we had plenty of time. Teardown was pretty much that, take off or dismantle what we didn’t need. We sold things we didn’t want or need and I basically am working with a free Sidekick. The entire front clip came off, then the tub. It was a rolling chassis in no time. The front frame was cut off, relocated, and plated similar to the “Rockstar”. Then the rear links where lengthened to match. The “Rockstar” build keeps stock driveshafts too. A 2 door rear driveshaft is now the front driveshaft, a 4 door rear, is now a 2 door rear driveshaft. See, Stock Parts! Easy to find stock parts versus a custom made part. Good thinking Mike!


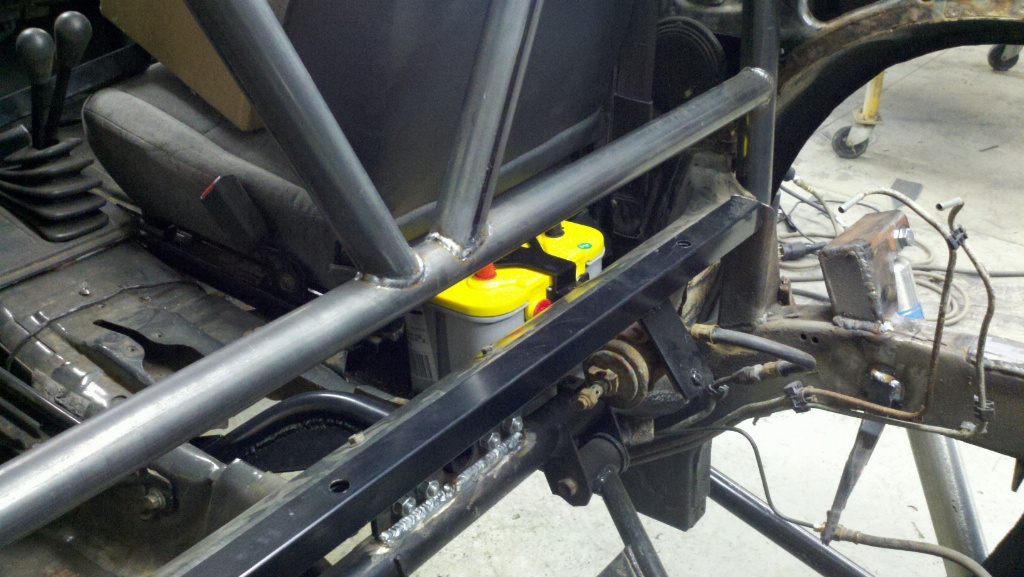
The parts we reused from the 4 door are vital. The Calmini Anvil and the Ford 9″ rear axle with 5.83’s and Detroit Lockers. Those parts were from another salvaged rig, Zukipilot’s old Sidekick. I picked them up when I was putting the 4 door together for it’s first trip to Moab a few years ago. I also had the 4.23 to 1 Transfer Case gears and a twin stick, they went into the new rig along with some of the Calmini Lift. I used the Lower Front Arms, Rear Coils, and the Rear Upper Link, which was later modified for the stretch. This is looking pretty cool now!
Some areas of the frame had to be reinforced. It had been wrecked in the rear and you could see it in the floor, transmission tunnel, and frame. The frame was reinforced with plates and the rear floor was cut out for the end result with the fuel tank placement and other goodies.
The tub was put back on and the ride height was determined. The front has Calmini Lower Arms and OME Coils. That set the ride height for the front. Now, just keep it level. The rear coil buckets were relocated for the longer links, but they were tacked in until some of the build weight could be put on. With the rear floor cut out, the fuel tank was raised and placed a little forward. The plan is to have a rear winch, roll cage, and give the rear a deck to separate the front seats from the fuel tank and provide a flat surface to secure things to. The roll cage was the end result of looking at pictures until you can’t look anymore. You just need to see what others have done, to decide on some lines, but keep it simple. The dash was taken out to allow the tube to go thru the speaker holes and tie into the floor. I didn’t want to have a tube around the dash to hit when getting in and out. Don’t worry about the speaker holes, we reused the speaker grilles to cover the opening, but before it was buttoned up, the driver’s speaker grille was fitted with a external CB speaker. Sneaky…
Roll cage done and the dash back in, we started working on the rear ride height and shock placement. The Calmini 3″ coils were reused in the rear. The spring buckets were located accordingly for the lengthened rear links, then the weight of the rig, for it to sit level. I personally don’t like the rear being lifted more, so if anything, I wanted the rear to sit a touch lower. Bilstein Shocks are helping the rear stay smooth. I had to put limiting straps on it to keep the shocks from bottoming out. DANG! The rear really drops out! It’s almost too much, but I like it!
The original plan was a chopped up, bobbed, narrowed, with minimal body, but the more I started to look at it, I wanted full doors. Then, it was, well, I want the whole tailgate. Basically, it went from wanting chopped and bobbed, to wanting as much stock sheet metal as we could get.


The rear was basically cut to a minimum at the top of the wheel opening, straight to the back. We wanted to reuse the stock tail lights. We did, just had to cut them short and I dropped the reverse light. The tailgate jamb was thinned out and plated, then the BFG’s folded the corners in, once it was in use.
The front was a lot more to do than the rear. The radiator support needed new mounts, the grille is now too wide for the tires to steer, and the headlights were even going to be in the way. “But Rick, I want to use the stock grille.” Well, that’s what I got. Rick came up with a couple sweet stock headlights cut down to fit the frame and stretch he had just created. The front suspension was cycled up and down, then trim the fender and try again. It was kept as tight as it could be. The grille was put in, then cut to match the fender line and the front body mount. Rick created some heavy plated sides for the lights and then a pocket for turn signals. Too Sweet!
While working on the front, we knew we had to reinforce the strut towers in a big way. They are weakened when you remove the inner fenders like we had. Rick made a strut tower brace, then tied that into the firewall. The towers were tied into the front frame area too. They weren’t going to move this time.
For the front bumper, it was tough to design. Basically, how do you keep it from being too big? After thinking about what needs protection and what needs covered, that’s what we did, the minimum. The shape keeps the steering box enclosed, then to the front frame rails, then under to the lower arms. Rick decided to notch out the bumper to put lights in it too. AWESOME! It fits the lines of the grille and allows room for the 2 Hella lights. We added the shackle tabs front and rear, because you just don’t know. I might need a little help. Note the aluminum donut in the front, the winch rope comes thru that, but wait, didn’t you say winch in the Rear??? Yes I did. DISCUSSION THREAD


The rear bumper is pretty basic. Square up the frame, have a couple shackle mounts, and house the winch. But how are you going to use the winch in the front? Simple… The winch is stowed away and keeps some weight in the rear. Now, just run a guide line down the center. But what’s going to keep it from getting caught, snagged, or burned? Again… Simple. It runs down the transmission tunnel thru a piece of DOM tube. The DOM is smooth wall and very strong. The winch line runs inside of it and it’s guided around a couple of smooth 45 degree bends. Once laced thru the tube, the winch can be used in the front just like normal. Tie off the winch on the front shackle and you can use the winch out the back. Allow some slack, tuck the loop thru the rear fairlead, then use a snatch block. Now this is for MY benefit only. The Sidekick is pretty lightweight and I don’t think I’ll be pulling anybody out, but I can pull myself into or out of whatever comes my way. I have another strap and a couple shackles just in case I need a little more length.
During the build we kicked around what size of tires and rims. For me, this was a no brainier, I wanted 39″ BFG Krawlers. Rick wanted 37’s, but it was my rig, my executive decision. Then I figured, if I’m going to go that big, I just as well get beadlocks. I went with Trail Gear’s Creeper Locks. I’m very happy with both! I tried to shop for used, but everything was too far away, or already sold. I had to bite the bullet. These were the biggest expense for the build. The winch, tires and wheels, all are brand new. I tried, but couldn’t find any deals. My build had officially cost me some big money now!
Toward the end of the build I decided I wanted a stereo of some sort. I wanted 6″ round speakers front and rear and a bass tube. Where were the speakers going to go? The bass tube? Well, I searched to see what the guys with side by sides were doing. One guy said he made speaker enclosures with pvc, another guy said dog food bowls. WHAT? Yep, Dog Food Bowls. The 2 speakers in the rear went in like you would think, sunk into the lower targa, where the rear passengers feet would be. The front… I just held the bowl up to the floor, punched 2 holes in them thru the firewall, assemble, then weld the bolt to the bowl. Take it back out, assemble the bowl, foam insert, speaker, then bolt it back onto the firewall. COOL! Now the bass tube, where you going to put that? Under the driver’s seat. It is a 2 seater, you don’t have to move the seat ever. I already had the Optima battery and box under the passenger’s seat. Great Idea! Just had to shim the seat a bit to make it sit a little taller. The tube fit right under it then. It doesn’t wake the neighbors, but I assure you, you will have No Trouble hearing it with the doors off and the top down!
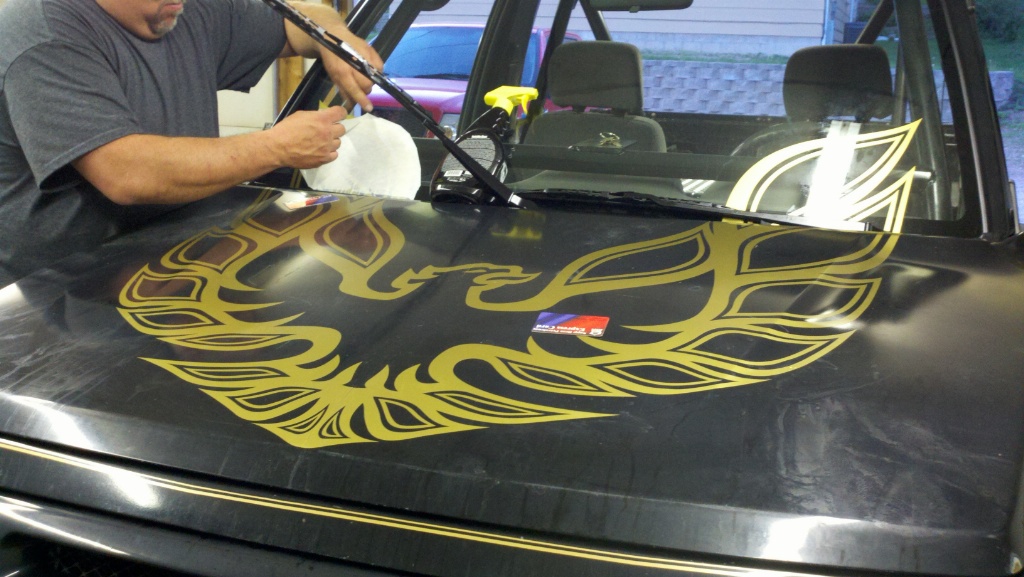
As the Moab trip got closer, I realized that I wouldn’t have everything done, but I didn’t care. It was almost done other than some rock protection and a nice paint job. I wanted a nice black paint job, but it ended up going out with the same black paint that was on it when I got it. One thing I had to do, was make it mine! I miss the Zuks Of Hazzard Samurai, well, I miss the attention that it got, just cause it was fun to look at. This rig had to be fun to look at too. So the Smokey and the Bandit Trans Am it was! I picked up some cheap eBay Firebird stickers, a roll of gold pinstripe, and it was on! The Firebird hood sticker is huge, I ran out of hood and put the leftovers on the windshield. The sticker quality was fair, but putting that son-of-a-gun on, was a pain. It wanted to stick to itself and not release from the mask. If it hadn’t been for Rick, I know I wouldn’t have pulled that one off.
Looking back at the Sidekick once the stickers were on, I had to laugh. I kept telling people it was a Smokey and the Bandit stunt vehicle. If you were standing across the street, at night, squinting, and drunk… It looks just like a Trans Am! :)
This rig had a few city miles on it before it was loaded on a trailer and headed for Utah. We got to town Friday night, unloaded it and started on the trails first thing Saturday. We had such a good time that we were actually rattled from wheeling all week. We cut our trip short by a day. Next year I’d be happy to take it just like it is, but you know that doesn’t happen. I want some rocker and body protection, and if it all comes together, I’d like a Suzuki V6.
1996 Suzuki Sidekick, 4WD, 2 door, 16 Valve, Auto,
IFS Front frame stretch with Calmini Lower Arms, OME Coils
Rear links stretched with Calmini 3″ coils and Bilsteins
Front Calmini Anvil with Nissan Maxima V6 CV’s
Rear Ford 9″ with disc brakes
5.83’s with Detroit Locker Front/Rear
Trail Tough 4.23 to 1 Transfer case gears with Twinstick
39″ BFG Krawlers on Trail Gear’s Creeper Locks
Rear Mount Warn 9.0RC winch, can be used front or rear
Full Pioneer Stereo/Speakers and a Bazooka Bass Tube
Cobra CB with External Speaker