 ZUKIWORLD Online – Everything Suzuki Your Complete Suzuki Automotive Resource for Editorial, Tech, Events, Adventure, Racing, and Forum

Weber 40DCOE
A few time saving tips for initial set up of sidedraft carbs. -Eric Bewley
Corvallis, OR. -You just purchased a set of Weber 40DCOEs for you Suzuki Samurai, spent a couple of weekends installing and trying to figure them out, and you bent the technical support person’s ear off. Now, you are ready to chuck those darn things at the closest dumpster. WAIT! Before you do that, here are some notes that will hopefully answer some questions and will get you on the road.

Initial setup and rough in. This will help to get you close not dead on. The assumption is that you have everything bolted up and attached and you are just about ready to fire it up. Take your front idle stop screw out and put it in a nice safe place, read that ‘dispose of screw.’ Back the balance screw out so that it is not making contact with the tab for the front throttle shaft. Back the rear idle stop screw all the way out so that the stop from the rear throttle shaft is resting on the cast tab of the carburetor. Carefully and slowly turn the balance screw in clockwise until it begins to make contact with the tab for the front throttle shaft. Turn in the idle stop screw 1 1/2 turns after it contacts the throttle shaft tab.
Set all of primary mixture screws, Fig. 1 part #56, at 2 1/2 turns counterclockwise from GENTLY seated. Start the engine, set your initial advance for 12 degrees at 1000rpm, and let it warm up. With the engine idling at 1000rpm, adjust the #4 mixture screw for the highest attainable idle. Start by turning clockwise but realize that the optimum setting may be anywhere within the range of the mixture screw. NOTE: Take care to adjust the mixture screws slowly as it may take 5 or more seconds to see a change. Reset the idle to approximately 1000 rpms and repeat the step #9 for all 4 barrels. If you run the mixture screw all the way in and out with no results on either two pairs, ie #3 and #4, your throttle shafts are probably not close enough in sync to work. Restart at step #1. NOTE: If at any time you get ‘lost’ on the adjustment, feel free to reset the mixture screws and idle screw and start over. Please, take your time.
Ignition timing issue. There is not a correct source of vacuum for vacuum advance on your distributor. The weber 40 DCOE doesn’t have a port for that. I’ve seen many sidedraft users attached the vacuum line to the manifold. This is incorrect because the vacuum on the manifold is backwards to what you would want. It is high at closed throttle and low at WOT. Furthermore, the mechanical advance on a stock suzuki distributor is not enough by itself. The stock distributor advances 7 degrees, or 14 degrees on the crank, at 5500 rpm. Disclaimer -this was observed on the distributor tested. Suzuki factory specs are unkown at this time. So, if you set the initial advance at 10 degrees BTDC, you will only end up with a total advance of 24 degrees. A motor rewind and distributor shop was able to reweight and cut back the mechanical stops on our distributor so that we get 12 degrees, or 24 degrees on the crank, of mechanical advance at 4000 rpm. At 12 degrees BTDC initial we observed a full 36 degrees of advance at 4000 rpm. This will bring your suzuki engine alive.
Jetting selection. The setup that your 40 DCOE came with, 45F9 primary, F9 emulsion tube, 115 main, 200 air corrector, will work well with your engine. However, you may have noticed that it runs rich at idle and may load up. The reason for this is a trade off because without the correct mechanical advance certain concessions must be made. To compensate for slow timing the jetting is rich on the idle circuit and lean on the mains. What this does is give you a good progression, when the carb is in transition from the idle circuit to the mains, resulting in good driveablility. The leanness on the mains is to try and get the correct air fuel mixture with incorrect timing. If you get your distributor re-curved you will be able to run more fuel hence improve performance.
Choke (enrichening circuit) sticking problem. If it still don’t work it could be that one of the (enrichening circuit) assemblies are stuck open. Because the manifold that is available does not allow for the choke or enrichment assemblies, it is possible for the choke to stick open and flood out your engine. The fix for this is to place a 1/4 inch long piece of 1/4 inch steel round stock into the choke cylinder so that the choke piston can not become lodged upwards or ‘open.’ See Fig. 1.
Fig. 1
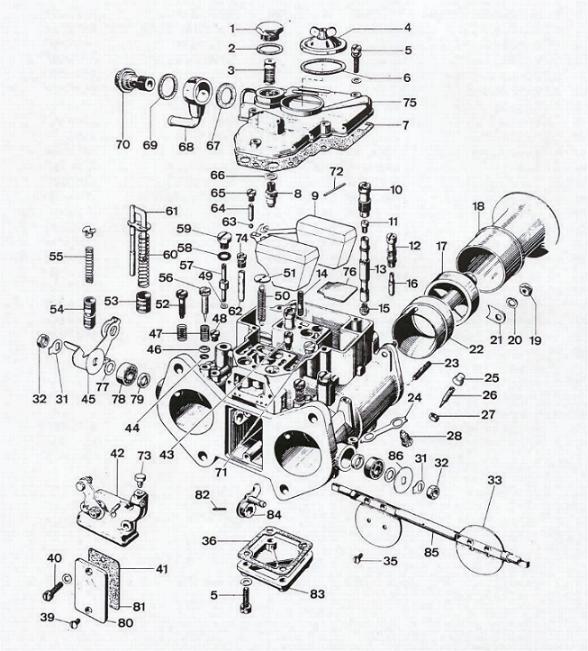
The block off modification goes in place of the spring, Fig. 1 part #55, or in addition to the spring. This will hold down the choke piston part, Fig. 1 part #54.
Watch your spark plugs for clues. Check your plugs and invest in a flow meter. Now that you have the thing running like a top and singing a song. It would be a good idea to check your plugs and make sure that the gas is burning correctly. We all remember that white plugs are lean, brown are good, and black are too rich. In addition, one can deduce even more specific details by the burn pattern of the plug. For example, what you will probably see after you get your carbs dialed in with a stock distributor, the outside ring and the upper part of the electrode is blackened while the tip is nice and brown. This signifies that the motor is running rich at idle and leans out as it’s rpms are increasing.
Ok, now you know enough to be dangerous so get out there and have some fun.


dcoe into single port manifold.
The 50F idle is a little thick, and the 130 mains are definetly thick.
Solder the 130s shut and drill out to 55.
Enlarge the air correction above 200.
I am running F4 emulsion tubes which are for 400ci engines.
Plan to correct to F11 when I find them.
Engine runs smooth and economical.
For a 2.0 double overhead it will run out to 7 grand quick.
Shifting is solid if the tps is advanced clockwise 1/4″ beyond stop.
Advance timing to 20* Hg.
All electrical is included(maf,ak,abt,tps)
Run T fitting on return of fuel. Add filter to carb. Reduction is equal to 5 lbs.
Fuel shut off is at injectors, so you have to wait till the bowl goes dry.
Keying ignition 5 times allows bowl to fill.
Air box is two harley air cleaner covers sandwiched.