Project ZR3
Building A Chevy Tracker The Way The Factory Should Have
Editor: Eric Bewley Story/Photo: M. Hagen
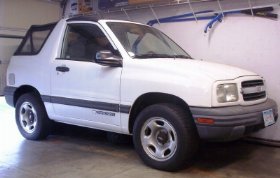
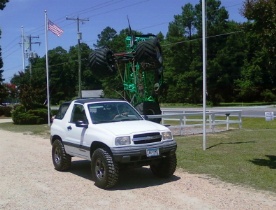
Minneapolis, MN – Last Year I bought a 2001 Chevrolet Tracker from the classifieds right here on ZW. It was rough and I knew it, but it ran and drove, so it had to be worth $800 right? A couple hundred miles later the motor let go in a big way. I was bummed at first but after I got over my flawed investment I decided to turn a lemon into lemonade. It has always frustrated me that Chevrolet / Suzuki had all the key components to putting a great off-road package together for the Tracker/Vitara but never did. The closest they ever came was the ZR2 which, in my opinion, fell way short. I would have built a 2 door with, a V6, steel front diff, the much larger XL7 rear diff, XL7 brakes, 5.12 gear ratio and 33 inch tire. I decided to do just that. This is where the Project ZR3 begins.

To help keep costs down I sold the stock tires, differentials, and a few other odds and ends, that I will not need. My investment in the Tracker is now just $250.
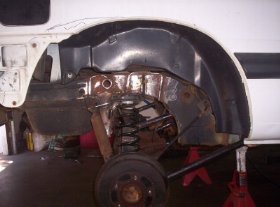
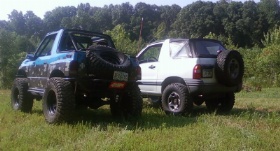
I wanted to keep as close to the factory ride as possible so I decided not to touch the factory front suspension. I needed a lot more fender clearance for a 33inch tire, and its a lot simpler to cut a plastic bumper away than to rework a fender/firewall. I decided to do a frame chop similar to the “Rockstar project”. This would achieve all of that, and give me a much better approach angle. This also leaves room for a 35 inch tire, if I decide to go that route in the future.
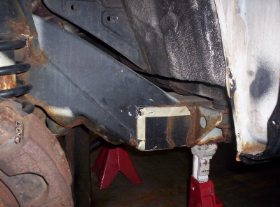
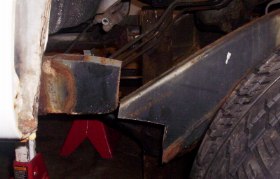
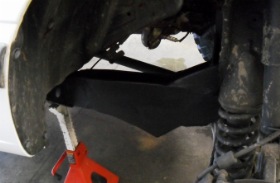
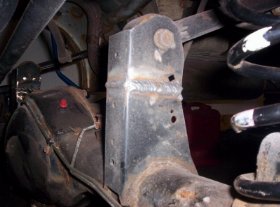
Ok, here we go! The front end modification or frame drop may seem like a difficult but it really is not. With careful measuring and cutting, followed up with good welding the frame drop method is the best at giving affordable lift while keeping all the stock suspension geometry. I marked and cut the frame. I then moved the frame 4 ½ inches forward, 4 ½ inches down, and plated the frame.
Then off to the rear. I wanted to retain as close as possible to the factory ride. I had planned on moving the rear 4 ½ inches rear-ward, to match the front. I realized that the earlier measurements didnt account for the rear pan hard bar, on the newer body style. I was only able to lengthen the links 3 ½ inches, without hitting the gas tank. I cut all 4 links and extended them. They were sleeved, plug welded, sanded, and repainted.
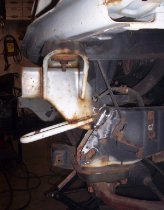
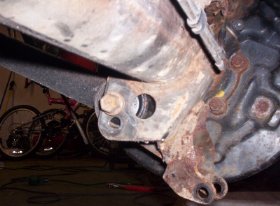
I wanted to reduce the amount of angle on the links. The straighter they are the better it will hill climb. I cut the original brackets off the tracker diff and welded them 2 inches higher on the top of the XL7 rear diff that I bought from a salvage yard for $180. That took about 2 inches off the upper control arm angle. Now it drives like it has 2 ½ inches of lift.
For the lower mounts I drilled the hole 1 inch higher at the axle and one inch lower at the frame which will also make it drive like 2 ½ inches of lift.
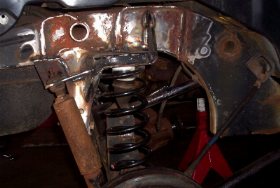
I cut the coil pockets off of the frame and lowered them 4 ½ inches and rearward 4 inches. That seems wrong but with the rear links being at a slight angle the 3 ½ inches of length added to the arms brings the rear axle an extra ½ inch rearward at full compression which is where I have to mount the coil pockets. I welded shock mounts in for factory shocks, but you may notice I didnt spend a lot of time on the brackets. That is because I will be switching the shocks in the near future and these mounts will be removed. The reason I didnt swap some aftermarket shocks in right away is because I wanted to keep everything as close to stock as possible for stage one of this project. That keeps a good baseline of at what point did my handling change. I had to swap the rear coils to 4 door coils. I think the added wheelbase, having the front wheels moved forward, and the large spare tire, moved a significant amount of weight to the rear. The rear was squishy and far too soft.
Somewhere around this time in the project I was feeling that I would have it done well before our family vacation to Florida, which was in a few weeks. My wife and kids really wanted to take the Tracker on the trip. I figured I had plenty of time to wrap up the project and still have a week to give it a shakedown to work out any quirks. Not wanting to disappoint I told them we can take it. This would be the beginning of many long nights. I always forget how long the little finishing touches of a project take.
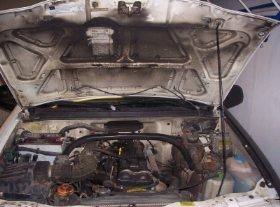
When you open the hood it was not a pretty sight.
I wont go into too much detail about bolting a motor in. Aside from welding up a couple of motor mounts it was pretty straight forward. A good cleaning was really needed too. A friend of mine had just totaled his 4 door ZR2 so we worked out a deal where I got the engine, trans, tcase, and wiring harness for $1100 but I had to pull it. While I had the motor out I swapped the front diff to a steel unit out of a 5 speed Grand Vitara and switched the gears to 5.12
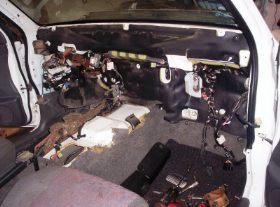
The wiring was really quite a project in itself. This ate up a lot of my free time and was making me really late on my timeline to have it done in time for the trip. It goes like this Strip everything to the firewall and transfer it from the V6 donor car. It looks like you dont have to, but you do. If it has a wire it has to be swapped. This includes the wiring harness that stays with the dash. One exception to that is the rear harness. The wires need to be re-pinned in the connector to match because the V6 never came in a 2 door. Luckily the wires to the rear harness are the same color, just pinned differently in the connector. Unfortunately, with my lack of sleep, this took longer to realize than it should have.
With just 2 days left it was time to cut out the fenders so the new tires would fit. I drew a rough line and started to cut weld and shape. I will not be showing any pictures of the carnage. It was ugly. This is when panic started to set in. Cutting the rear quarters actually went pretty smooth but while welding it together I started many a fire on the inside of the truck. Luckily I had all the interior panels out. I got this bright idea to weld from the inside out. So I could control the fires. It worked great except when I got out of the truck to look at it I realized that I had warped the metal in the rear quarters a lot. The damage was tremendous. With just 36 hours till we leave, this was not good at all.
Luckily I have a friend in auto body. This was Friday around noon and I told him Im leaving Saturday evening. He told me to bring it up to the shop ASAP. He dug in right away. While he was doing the bodywork I ran over to work for a few minutes. When I returned I saw that he had done a little more than I was expecting, actually, a lot more. I asked him are you sure you will have this done by tomorrow? He looked at me confused and said not a chance. My eyes got big and he says Did you mean this Saturday?!? We both turned and looked at it and he says It will be ready What he did to my rig in the next 24hours was nothing short of amazing. It was an amazing recovery to the trauma I had caused.
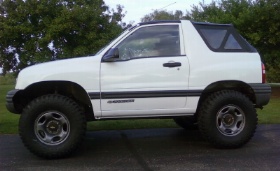
While it was in paint I mounted a set of 285/75/16 BFG KM2s on it. They measure 33inches with the weight of the truck. Another $1100 invested but very worth it. They ride amazing, are quiet, and most importantly work very well off road. I picked it up from the body shop and brought it home to finish putting the interior in it while my wife and kids were literally putting luggage in the back.
Reassembled
The weeklong shakedown I had planned earlier had now been reduced to the 16 mile trip home from the body shop. Well it must be ready to go on a 5000 mile trip right? The answer is yes. I left Minnesota and headed south with my wife and 2 kids.
Here is us at Diggers Dungeon in Kill Devil Hills NC
Down the coast to Daytona Beach, FL
And a stop at Zieglers in Nashville TN
Just a little over $3100 dollars invested. Its been nearly 9000 miles and it drives fantastic. Ive been to a couple off road events and it does perform very well even without lockers. The term sleeper got thrown around quite a few times. Stay tuned to ZW for future evolutions of this vehicle.
A few specs you may be interested in.
8 inches of frame clearance is now 17
86 inch wheelbase is now 93
Overall height is 6 foot 2 inches
Talk About it! Discussion Thread for the Article Here Forum Discussion

 ZUKIWORLD Online – Everything Suzuki Your Complete Suzuki Automotive Resource for Editorial, Tech, Events, Adventure, Racing, and Forum









I have been contemplating cutting the frame EXACTLY like you did or forking over$2k+ on a lift kit (Alter Ego or 4xFourART as they’re the only ones that move the from tires forward and rear rearward. Which is what I want even more than lifting it ). Really want to try to fit the calmini EDSES (Extreme Duty Strut Eliminator System) to my 2000 Tracker but they’re designed for the 1st gen Geo Tracker. Bolting on an upper control arm system would be sooo beautiful. Really dig your rig. Turned out absolutely amazing.
Can I just cut and move my frame on a 4 door zr2? Is it that simple?
I am looking at either putting a 4.3 or vw Betts turbo diesel motor in my 02 tracker and also looking to put cj solid axles under it too wanting too know be better either a 4.3 or diesel
I am about to do the same on my Tracker 2002 in order to but bigger tires. I looked at cutting the frame like you did. You mention it is no big deal but: What about the suspension struts? They also will move 4 inches forward. The drive shafts, the steering rod, the motor supports, ? Do you have more details available so it could save laborious time and figuring?
Hi Mike!
Great job on the Rig, it looks fantastic! I am looking to put a V6 in mine as well, I am curious about the wiring, I have a 2003 ZR2 and according to Chevy, the wiring for the 2 door is the same as the 4 door for years 2002-04 (WIRE HARNESS for 2003 Chevrolet Tracker #30028583). Like you showed in your blog, the wiring was a project in itself. Its a project I do not want to do… What was the year of the donor car? maybe the wiring not matching was a year thing and not a 2 to 4 door thing, At least that’s what I am hoping! I have my truck so packed with electronics, I dread taking it down to the firewall, I do not have that kind of time!
Thank you,
Brandon
I need fuel tank for my 03 chevy tracker ZR2 16.9 gal . I cant find a new one no were , used one is what i will have to get. Can you help me? part # 91176536
Mine started to leak after hammering it in the rocks in Moab so I bought a used one out of a 4 door Vitara. It bolted right in.
Hey, I have an 04 and have coated the tank with undercoating to keep it clean and rust free. I ha e also checked into replacement tanks. I can build you a tank that will not need to be modified to work, but will be expensive to purchase. Let me know if you’re interested.
KevzxtcTracker
The tank comment is for Eric Slad…..