SHROCKWORKS
ShrockWorks Armor on Project: Hermey – Front Bumper
Editor/Photo: Eric Bewley
ALBANY, OR – Project: Hermey has become quite a reliable stable mate to our other vehicles and has happily carried guests and us alike on many adventures since it’s beginning. One of the things it has always needed; however, was some armor to protect it from trail damage. Fortunately, Jim Shrake from ShrockWorks has the solution. We will be adding all of ShrockWorks Samurai armor to our project and will bring you the installs and reviews over the next few months. Or first installment deals with, and is probably the most important and usually the first piece of armor purchased, the front bumper. Our ShrockWorks front bumper is winch enabled with the optional 2 inch receiver.

Installation of the bumper was quite simple and went well for us. All of the necessary hardware is included and the directions were adequate. Our install was slightly unique due to the previously installed Trail Tough YJ suspension kit. We were able to skip a few steps that one would have to do if they did not have this suspension kit on their vehicle. That difference is documented below.
1. Unbolt the indicator light assembly. 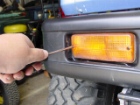 2. Remove license plate.
  3. Disconnect indicator wire plug.
  4. Disconnect indicator ground wire and remove bumper.
  5. Skip to step 7 if you have the Trail Tough YJ Suspension lift on your vehicle. – remove stock bumper mount bracket and tube as pictured.
 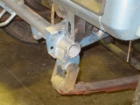 6. Install the frame sleeves for the mounting bolts. Weld for extra strength if desired.
 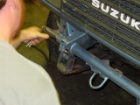 7. With the Trail Tough YJ lift, sleeves are already in place and the mounting bolts are already started through the frame.
 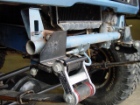 – Picture showing the 3/16″ washer that is required to mount the bumper if the suspension bracket is not there. –
  8. Carefully, so as to not damage the threads, tap the mounting bolts back with a hammer so that they are flush with the bracket or 3/16″ washer.
  – Picture demonstrating step 8 –
  9. Lift bumper in place and carefully, so as to not damage the threads, tap the bolts through the holes using a hammer.
 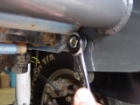 10. Snug the bolts but to not tighten. At this point one can install the optional extra bracing. The included instructions from ShrockWorks take you through the steps to install two extra u-bolt clamps and an ‘L’ bracket for extra support when winching. Once all desired hardware is attached, Tighten down the bolts. Re-check your work after your first outing to verify that the bolts are remaining tight.
  11. Prepare the wiring harness for the new indicator light. We used the wire lead from the stock light and married it to the new light’s harness using butt-splices.
  12. Wrap your wires with electrical tape to help reduce moisture intrusion.
 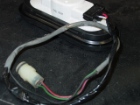 13. Clip in the wiring harness into the new light
  14. Install the new light into the bumper. Once the light is flush with the bumper, press inward to ‘set’ the light into the hole. This type of light floats in the rubber grommet to help it withstand impacts.
 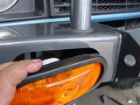 15. Re-install the wiring plug and reconnect the ground wire.
  16. Install your favorite winch, sit back, and admire your work!
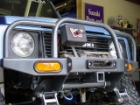
The fit of this bumper was superb. We had chosen to have the ShrockWorks armor sent to us bare and had it powdercoated locally, so we are unable to comment on the finish from the factory but if it is anything like the build quality, we are confident that it is top notch. This new bumper gives the Samurai and nice aggressive look with ample protection from branches and rocks which like to reach out and say hi so often here in the North West. Approach angles are not compromised with this bumper. Additionally, turning radius in not effected either. We look forward to bolting on the rest of the ShrockWorks armor and using project: Hermey in the upcoming months.

 ZUKIWORLD Online – Everything Suzuki Your Complete Suzuki Automotive Resource for Editorial, Tech, Events, Adventure, Racing, and Forum

