 ZUKIWORLD Online – Everything Suzuki Your Complete Suzuki Automotive Resource for Editorial, Tech, Events, Adventure, Racing, and Forum

Project Mr. Mutt
Building a Samurai with VINTAGE SUZUKI. -Ted Holman
The summer was rushing on and the Rubicon was coming up. I finally got the running gear back in place and started adding the suspension parts. My ’90 had been a SPOA and I was jazzed to be able to install a CalMini 5″ Reverse Shackle kit and the anti-bump steer linkage to the new rig.
The parts bolted on with amazing simplicity. In a few hours, I had the frame sitting on its new springs and shocks, rolling around the shop. The next step was locating a good body. I begged and pleaded with Rick Hawkins until he finally sold me this “cherrie” white convertible. I dragged it home and started to clean it up. The previous owner must have been given a portable drill for Christmas. I spotted in over fifty holes in the floor of my new body. Now before anyone starts thinking that I know what I am doing, I paint very poorly, but I weld worse. 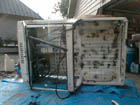
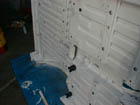
I spent the next week after work, cleaning, scrapping and patching the body. I wanted to paint it before I put on the frame so that I could get to all the parts that would be inaccessible after it sat on the rails. If I said that I did not drink a couple of beers while this was going on, I would be misleading you.

work inspector
This was sort of like furniture refinishing. At times I would look at the pile of parts I was dealing with and shake my head in disbelief. What endless path had I started down? Hmmm, another beer and more sand paper.
Finally I was ready to join the body and frame. I had extended the body mounts studs so that I could include an extra body bushings for a 1″ body lift. The rig had a Tracker gas tank with the fuel pump plus the necessary plumbing to run the Fuel Injection. This required a little more space between it and the body then did the stock Samurai tank. Lowering the body on to the frame was relatively easy. I had modified the transmission/transfer case tunnel to except the Tracker transmission and found that I was about ½ ” off on guessing placement.
That was the biggest surprise and one I solved quickly (third favorite tool, large hammers). I bolted the two together, attached the steering column and rolled the rig back into the garage. I had a Samurai once again. Everything looked simple from here. Right. I had to reattach the wiring loom, which was a no brainier. 
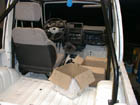
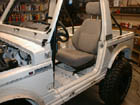
The thing that got me agitated was reinstalling the dash and getting the body panels to fit. Here is a secret, don’t have the roll cage built in the car until it is all assembled. Anywhere the cage was near became an interference fit.
At this point, I still have not worked out the driver’s door closing, but at least the rest is close! Now it was onwards through the time consuming “easy” part of getting the rig up and running!